Editing an asset in DXM
You can make changes to your content in DXM using a variety of editing modes in the Content view. Each mode offers a unique editing experience depending on your need.
User scenario
You need to use DXM to add a new image to your upcoming blog post and link to another page on your website. You also need to ensure that alt text is included to the image.
Inline mode
The inline mode is an editing mode that allows you to edit content in a preview mode using WYSIWYG controls.
To access inline mode:
- From the File View, locate the asset you wish the edit and open it.
- From the menu, click Inline. DXM opens Inline mode.
- Click into any text on the page and start typing. Use the controls to adjust text accordingly.
Inline view
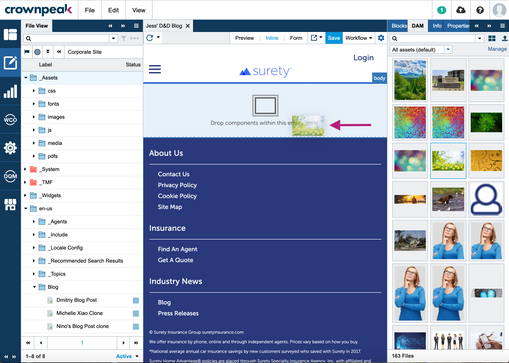
Drag and Drop
Use the Drag and Drop feature to easily drag and drop components from the Blocks panel into your content. For example, you can drag image assets from the DAM panel into your blog post to quickly add graphics into your content.

Special considerations
- You must be in the Inline mode to use the Drag and Drop feature
- The Drag and Drop feature only works with assets created using a template built to include drag and drop zones
- Dev team must create the components and make them visible in blocks panel
To use Drag and Drop:
- From the File View, locate and open the asset you wish to edit.
- Ensure you're in Inline mode.
- From the DAM panel, click and drag an image into the Drop components within the empty zone field in your asset.
Drag and Drop using the DAM panel
You can also drag and drop components from the Blocks panel using the Basic and Advanced components from their respective tabs.Drag and drop a component using the Blocks panel Basic tab
Drag and drop components using the Blocks panel Advanced tab
- Adjust the image or other assets and text accordingly.
- When you're finished, click Save.
Form View mode
The Form View mode is an editing mode that allows you to edit both visual and non-visual elements content within form fields for each section of the asset. For example, the page metadata or an image alt-tag. The form is structured to match how the template was coded including naming conventions and nesting.
To access Form view:
- Locate and open the asset you wish to edit.
- From the menu, click Form. DXM opens the Form view mode.
Form View
Form tabs
Form view displays various tabs available for customizing content in your asset and based on the asset's template.
Note: Assets in DXM will have different tabs available depending on the asset template type you're viewing, such as:
- Main
- Taxonomy
- Page Properties
- Metadata & Header Content
- TMF
- CSS/JS
- Sitemap
Source mode
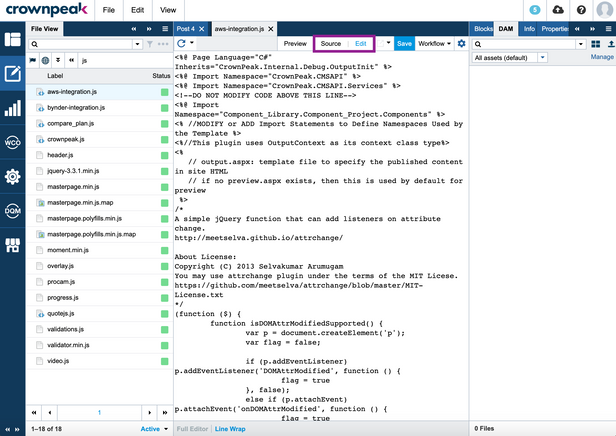
Use the Source mode to edit content in a source code view. Some assets, like stylesheets or template files, will only be available in Source mode.
To access an asset’s source code view, simply open the asset. Click Edit to edit the code.

Editing a WCO snippet's source code
- Locate and open the asset you wish to edit.
- Ensure you're in Form view mode.
- From the WCO Content section, click Tools > Source code. DXM opens a HTML source code dialog box.
WCO Source Code
- Make any changes within the source code accordingly.
- Click Ok when finished.
Preview your content
There are a couple ways to preview draft content before publishing to an environment.
Preview mode
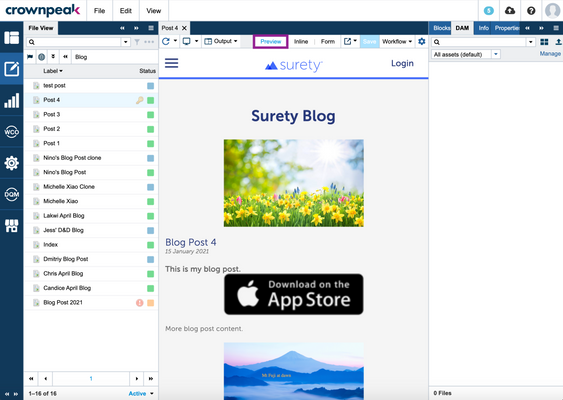
Preview mode allows you to quickly see your draft content in the built-in DXM preview as you might within a webpage.
To access Preview mode, click Preview from the opened asset's menu.

DXM will render your content as you would see it on a web page.
Web View
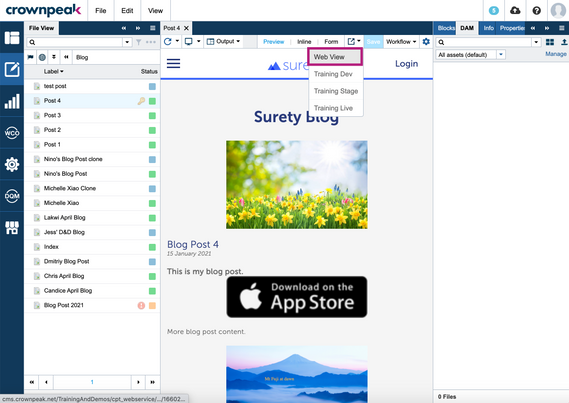
The Web View allows you to see your draft content in a new browser tab. This view provides an unobstructed view of your page.
To access the web view, click the Last published Urls drop-down. Click Web View.

DXM will render your content as you would see it on the web page in a new browser tab.
Mobile & Tablet view
You can also enable device-specific previews for mobile and tablet screens. This allows you to toggle between several different predefined screen widths in preview mode and may be helpful when trying to test your site's responsive design.
When enabled, you'll see the following drop-down menu appear when previewing an asset. Simply select an option from the drop-down to view the page in that setting.
To enable device-specific previews:
- Navigate to Settings (Gear Icon) > Configuration > Output Views.
- Click Add New Device.
- Choose an icon, and give your device a name and specify the width (in pixels).
- When finished, click Save.
- You may need to log out and log back in to see your changes.
Changing an attached file's name
When using a Document Selector control (ie. Input.ShowAcquireDocument() or Input.ShowAcquireImage()), there are two ways you can modify the the file name of the selected asset:
1. Upload the file as a separate asset and then select it using the document selector
Using this method, since the upload is a separate asset, it has its own unique DXM generated file path and URL. These are generally constructed by the asset label and the folder that the asset is contained in.
- Upload the file into DXM as a binary asset.
- Edit the parent asset.
- Using the document selector, navigate to the location where you uploaded the file in step a and then select the file.
- Save your asset.
Publish the uploaded file followed by the parent asset (in that order).
2. Select a file from your local computer directly
By default, files selected from your local machine will be published with a default DXM-generated filename. For an example of the filename output, please see here: Uploaded Asset Filename
- Utilize the asseturl.aspx and assetfilename.aspx in the template to change the default filename.
- Create/Add the asseturl.aspx and assetfilename.aspx template files to the template.
- In the assetfilename.aspx, you will need to set the context.PublishPath value to the desired publish path (ex. /folder/filename.aspx).
- In the asseturl.aspx, you will need to set the context.PublishUrl value to be the desired url (ex. /folder/filename.aspx).
- Publish the asset.
Please note that the asseturl.aspx and assetfilename.aspx will be run for each file uploaded into the asset.
The code below provides an example of how to change the default DXM-generated filename to the original filename for all uploaded files.
Code for asseturl.aspx, used to modify the url of the uploaded asset.
string strPath = context.PublishPath;
    string publishedFilename = context.RemotePath.FileName; // Get the filename path
    IEnumerable<KeyValuePair<string, UploadedFile>> uploadedFiles = asset.UploadedFiles.Cast<KeyValuePair<string, UploadedFile>>(); // Cast the Uploaded File List as a KeyValuePair
    KeyValuePair<string, UploadedFile> kvp = uploadedFiles.Where(kv => kv.Value.Path.Contains(publishedFilename)).FirstOrDefault();//Find the first Uploaded File with the desired Filename


    if(!kvp.Equals(default(KeyValuePair<string, UploadedFile>)))//Make sure the filename isn't default
    {
        strPath = strPath.Replace(publishedFilename, asset["upload_name#" + kvp.Key]);//Replace the filename with the desired filename
    }
    context.PublishUrl = strPath;//Set the publishURL
Code for assetfilename.aspx, used the change the server side path of the uploaded asset
string strPath = context.PublishPath;
    string publishedFilename = context.RemotePath.FileName; // Get the filename path
    IEnumerable<KeyValuePair<string, UploadedFile>> uploadedFiles = asset.UploadedFiles.Cast<KeyValuePair<string, UploadedFile>>(); // Cast the Uploaded File List as a KeyValuePair
    KeyValuePair<string, UploadedFile> kvp = uploadedFiles.Where(kv => kv.Value.Path.Contains(publishedFilename)).FirstOrDefault();//Find the first Uploaded File with the desired Filename


    if(!kvp.Equals(default(KeyValuePair<string, UploadedFile>)))//Make sure the filename isn't default
    {
        strPath = strPath.Replace(publishedFilename, asset["upload_name#" + kvp.Key]);//Replace the filename with the desired filename
    }
    context.PublishPath = strPath;//Set the PublishPath
When a file is uploaded from your local machine, the document selector control will save the original filename into a content field prefixed with "upload_name#." The code above replaces the default DXM-generated filename with the value saved in this field.
Note: Be careful when modifying the assetfilename.aspx or asseturl.aspx as it could potentially cause conflicts with other assets if both assets are publishing to the same location.


