What is the form builder?
The DXM form builder is a robust content delivery engine that provides Testing and Targeting capabilities at run-time, all on the Client-Side. The form builder doesn't require any server-side development for its core features, which makes it an ideal personalization platform working alongside the de-coupled DXM.
You can configure the form builder to optimize and deliver targeted content to users who belong to target groups configured to match specific user attributes. These attributes include ambient data, form data, behavioral data, as well as third-party data.
In order for forms to optimize content based on form data, you can configure DXM to process the actual forms. Forms provide robust form processing capabilities that alleviate the need to build back-end or server-side apps or services to process forms.
One of the most powerful features of DXM's form processing capabilities is its ability to re-post or relay the collected form data to one or more third-party services. This is possible thanks to DXM's form connectors technology.
It offers a number of form posting connectors out-of-the-box designed to post form data to third-party form processors, including SalesForce, Eloqua, Marketo, ExactTarget and others.
This guide demonstrates how to use these connectors, and how to configure custom connectors.
Leverage form connectors to take advantage of the following capabilities:
- Create and configure Forms using the builder, alleviating the need for a back-end application or service to processing forms.
- Use the collected form data instantly throughout the website for content targeting purposes.
- Repost the collected data to one or more form processing engines using the form's connector technology.
Form connector benefits
- Quickly and easily convert any functioning form and configure a custom connector to continue to send the form data to its current destination. This allows DXM authors and editors to leverage the collected data for targeting purposes.
- Create one form and post the collected data to one or more form processing destinations using form connectors at the same time.
Use WCO connectors to post form data to:
- CRM platforms: Salesforce, Dynamics
- Marketing Automation platforms: Marketo, ExactTarget, Eloqua, Silverpop
- Any other form processing service: Surveys, Polls, Registration services
- Any form processing application: Use the current form Action to define a custom WCO Connector
Quickly and easily configure a custom WCO connector with the following information:
- Form Action
- Required Form Fields
- Static/Hidden form fields required by back-end application or third-party service
WCO Form Connectors Considerations
Configuring forms to submit collected data to any third-party service is easy. However, take care in the naming of form fields to ensure the names of the fields match the form fields expected by the third-party service.
If DXM will process the forms, then the builder will need to be in complete control of the form processing experience, including the Redirect URL. This is the URL the user is redirected to once the form is processed. This means that third-party services cannot redirect the user after receiving the form data from the builder.
Form connectors configured from business processes
You can configure form connectors to support many business processes. Before starting the configuration, it is beneficial to solidify the scope of the configuration. Use this list to determine how the customer is going to use a WCO connector in their instance:
- Does the customer have an existing form they want to convert to WCO?
- Does the customer want the form data to be submitted and sent to the current form processing application or service?
- Does the customer want to capture leads by submitting the form data to a CRM, such as SalesForce, or to a Marketing Automation Platform such as Marketo?
Configuring form connectors
Once the business process is understood, configure form connectors.
Managing connectors
To access the Manage Connectors interface, click the DXM main menu, click the WCO icon > Settings > Settings > Global Settings.
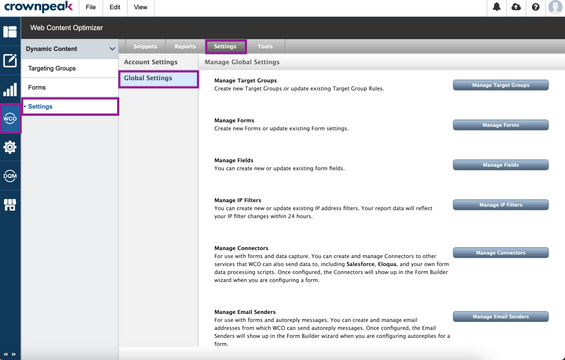 Managing connectors interface
Managing connectors interface
Creating a new connector
- From the Manage Connectors interface, click Manage Connectors.
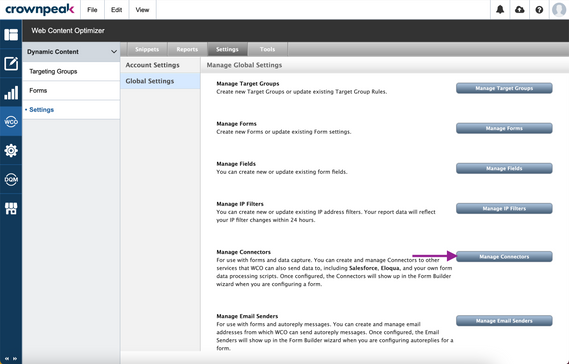 Managing connectors button
- From the Manage Connectors dialog, you can create a new connector. Complete the following fields:
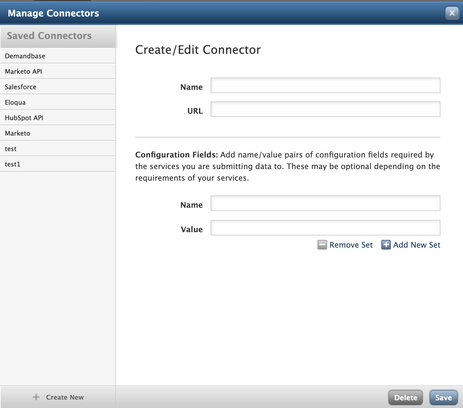 Create a new connector dialog window
- Name - This name will appear in the Connector selector drop-down in the Form Builder
- URL - This is the form action
- Configuration Fields - These are fields that the form builder will add to the form fields that are filled out by the web user. These are fields that aren't changeable by the user, but are required by the form processing application or service. You can define as many of these configuration fields as necessary by providing a Name and a Value for each field.
Editing a connector
- To edit a connector, select a connector from the list.
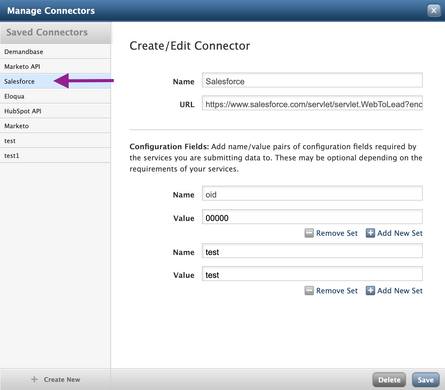 Editing the Salesforce connector
- Make any edits and click Save when finished.
Note: In the example above with the Salesforce connector, certain fields may be locked because the Salesforce connector is a native connector. Other connectors you may be able to edit because they were configured as custom connectors.
Using form connectors
DXM form connectors are used with the form builder. The form builder provides a wizard-like process to capture form configuration settings and parameters.
The form builder provides a way to create forms with the following tabs in the wizard:
- Customize Form Settings
- Add Fields
- Post To
- Auto-Reply
- Copy Form HTML
Creating a new form
To create a new form, use the following steps:
- From the WCO menu, click Forms > New Form.
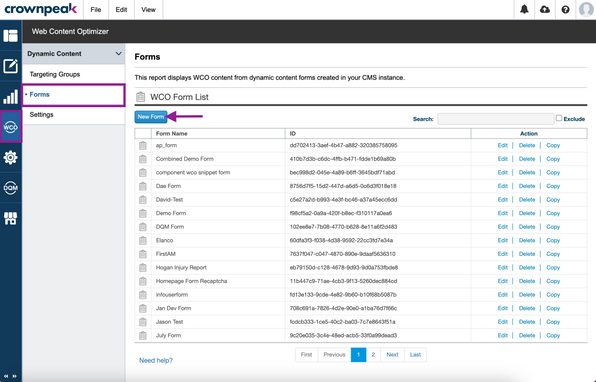 Create new form button
- From the WCO Form Builder, click and drag fields from the New field column to the drop area.
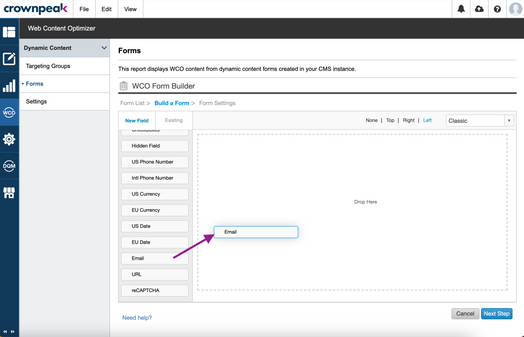 Click and drag fields to create form
- From each field, click Edit to edit the field or Delete to remove the field from your form. To learn more about the form builder fields, see How to Use the WCO Form Builder.
- When finished, click Next Step.
- Configure settings in the General, Notifications, Rules, Auto-Reply, and Embed Code settings. To learn more about the Form settings, see How to Use the WCO Form Builder.
- Click Save Form when finished.
Editing form tips
What to expect when editing form snippets:
- If you make updates to the form settings themselves (e.g. redirect URLs, auto reply, connectors etc.) those changes are reflected automatically as long as your HTML forms use that WCOFormID
- If the snippet containing your form is managed by a DXM asset, we don't recommended changing it directly in the form, as it will be overridden the next time the asset with the snippet is republished
- Direct form snippet changes are committed immediately, but won't update the asset's content automatically and will be applicable only until the original page is redeployed, which will override your direct changes
Note: The actual form HTML is added to the snippet content manually though (or by selecting `Insert HTML Code at End of Snippet` when inserting a form). So if you add or remove fields from the form you need to update the snippet content, even if you make the edit's directly in the WCO form editor. So if snippet X uses form A, and you edit form A directly by adding new fields, the form HTML in snippet X won't be updated automatically (so it won't include those new fields).
Note: If you add/remove form fields directly through WCO, the snippet content won't be updated automatically.
Setting specific email sender addresses
You can specify a specific email address as a sender of emails from DXM. To verify the email in DXM:
- From the WCO menu, navigate to Settings > Settings > Global Settings.
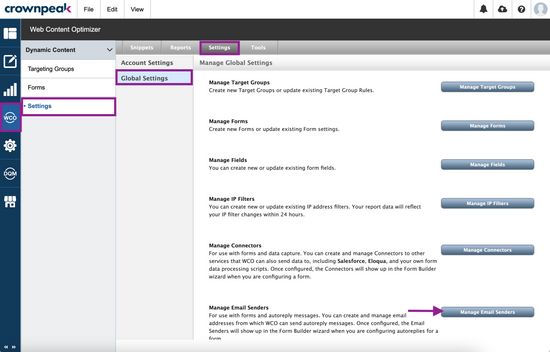 Manage Email Senders button
- Click Manage Email Senders.
- From the Manage Email Senders dialog, enter the desired email address and click Request Verification.
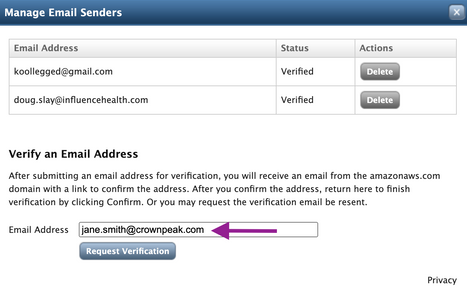 Verify Email Address
- The email address you added will appear in the list.
- You will receive an email asking to authorize the email address for use within Amazon SES. Click the link in the email to verify.
- Navigate back to the Manage Email Senders dialog in DXM and click Confirm.
Preventing spam in your forms
You can protect your forms from spam and abuse by configuring a reCAPTCHA on your forms. Google offers a simple solution for this problem. To start using reCAPTCHA, you need to sign up for an API key pair for your site:
https://www.google.com/recaptcha/admin
Add the following code in the <head></head> of your site:
<script src="https://www.google.com/recaptcha/api.js" async defer></script>
Add the following code to your form:
<div class="g-recaptcha" data-sitekey="xxxxxxxxxxxxx"></div>
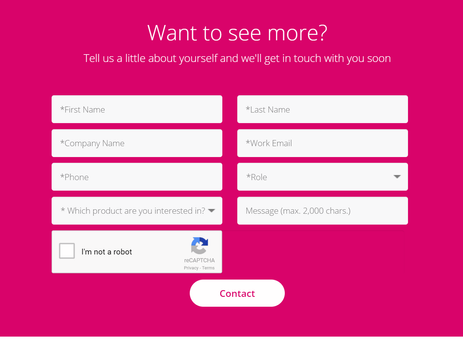
This usually is displayed right before the Submit button, where data-sitekey is the key you received when you set up. The end result will be the reCAPTCHA as shown here:
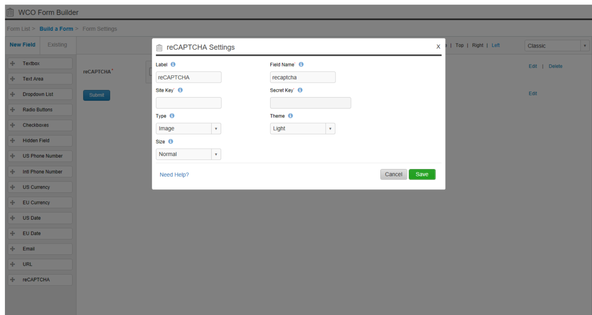
In addition, the form builder has the ability to create a reCAPTCHA field:
="inline" id="197i5B197B028D6EDE24" size="large" resized="true" sourceType="new">
Receiving alert notifications
To receive alert notifications on your forms, you can pass the information from the form upon submission to one or more emails by using "EmailRecipients". For example:
<input name="EmailRecipients" type="hidden" value='["myEmail@domain.com", "myEmail2@domain.com"]' />
Note: The values must be in JSON format.


