You can integrate DXM's personalizing content with third-party solutions. This guide includes information on integrating with the following solutions:
Salesforce Web-to-lead integration
Note: These instructions are originally available on Crownpeak's Github repository.
Salesforce's Customer Relationship Management (CRM) solution gives your sales teams the power to close deals like never before with cloud-based tools that increase productivity, keep pipeline filled with leads, and score more wins.
This turnkey integration creates a connector between DXM and Salesforce that generates leads. The connector also allows you to create content in WCO that is built in to the Crownpeak DXM platform and allows you to personalize content based on lead data.

WCO diagram
Capabilities
Use Crownpeak WCO to personalize a dynamic page experience, and deliver the content into Salesforce Sales Cloud.
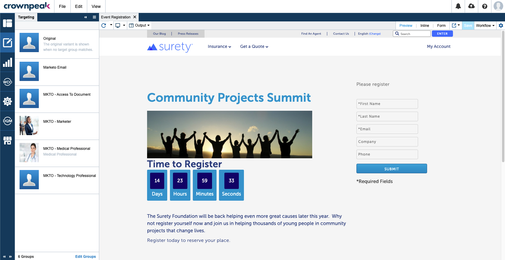
DXM Asset in Preview Mode, showing WCO targeting groups, allowing author to tailor the message to each user
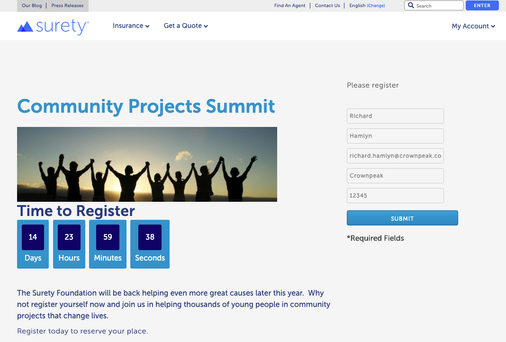
Page published via DXM, rendering form to end-user. Page is currently showing content for the 'anonymous' visitor group
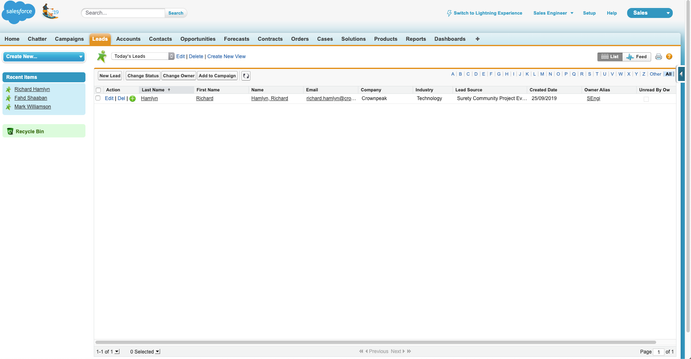
Upon form submission, lead data is transmitted securely to Salesforce Sales Cloud (CRM)
- Open your Salesforce account and find your Organizational ID. In the Salesforce Quick Find box type "Company".
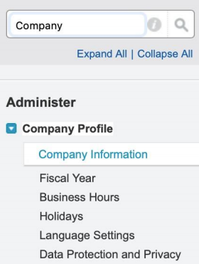
In Salesforce account, searching for organizational ID
- Click Company Information. In the Company Information window, locate the Organization ID. Save this ID for later.
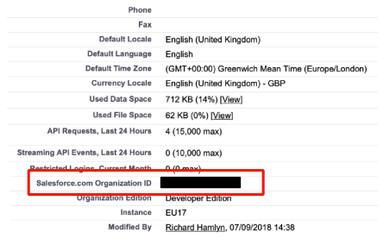
Organizational ID in Salesforce
- Within DXM, open WCO > WCO Standalone.
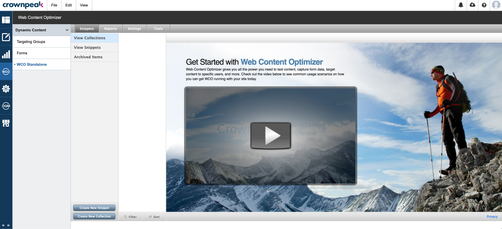
WCO standalone in DXM
- Open Web Content Optimizer.
- Select Settings > Global Settings.
- Select Manage Connectors.
- Select the Salesforce Connector.
- Add the Organizational ID you copied previously.
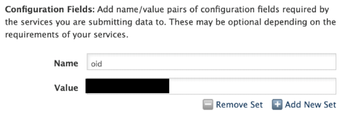
Adding the Salesforce organizational ID
- Enter your organizational ID in the Value field and save the connector.
- Go back to DXM to continue the setup.
- From DXM, navigate to WCO > Forms > New Form. We will use this form on a web page to inject visitor data to WCO and Salesforce using the connector we created earlier. This example form will create an initial lead in Salesforce. You may add fields you want to map.
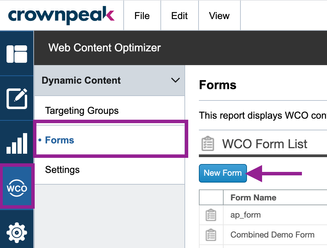
DXM WCO New Form button
- Click Edit for each field and ensure each form element’s name maps to your Salesforce data field names exactly.
- To find the names of your Salesforce Lead fields, open Salesforce and in the Quick Find box type ‘Leads’. Select Build > Customize > Leads > Fields.
- You can now map your Form Field Names with Salesforce Lead Field Names.
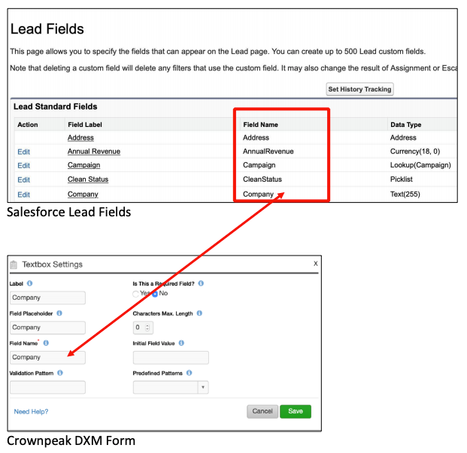
Mapping form field names with Salesforce lead field names
- Click Next in the Form Builder tool.
- General (tab) - Give your form a name. For example: "Salesforce Lead Form"
- Notification - Add details if you want to inform an individual that a form was submitted. You can also set this up in Salesforce when the lead is generated.
- Rules - Add a redirect page URL for when the form is submitted. In the connector, click on the dropbox and select the Salesforce Connector created previously.
- Auto-Reply - Add a standard response email that will be sent when the visitor submits the form.
- Save the form. The form is now ready for insertion into a page.
- Open an asset that has a WCO enabled WYSIWYG field embedded in it and click Create Snippet.
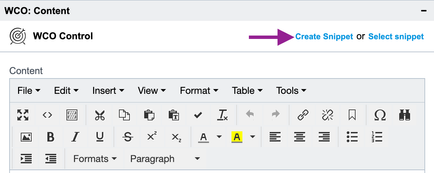
WCO WYSIWYG Create Snippet link
- Provide a suitable name for the snippet and then save the asset.
- Click Form.
- Save and preview the page. The form will not show styling in the WYSIWYG unless it has been bound with a style sheet; however, preview should show the form exactly how it will look on the site.
- You can now publish the page with your lead generating form and test it out. When a visitor submits the form, it will create a record in WCO and a lead in Salesforce.
Considerations
The Salesforce integration only works to inject data in to the CRM; however, it is possible to gather lead data at the front-end using a coded solution.
You can create personalization rules around the lead data that was gathered in WCO. In the example in this guide, that could be set to deliver content dependent on the visitor’s company or other data that you have chosen acquire.
Marketo integration
Create Connectors
In this guide, you'll create two connectors in WCO. One for sending data to Marketo and another one for SOAP API call.
- From DXM, navigate to WCO > Settings > Settings tab > Global Settings > Manage Connectors.
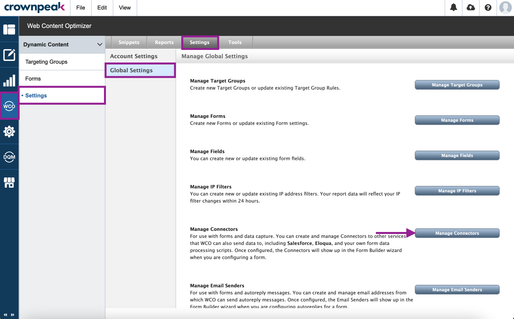
DXM WCO Manage Connectors button
- Select the Marketo API connector.
- Enter the SOAP API information from Marketo. Marketo configuration values can be found in the Marketo admin portal. Go to Admin > Integration > Web Services, and copy Endpoint URL, User ID, and Encryption Key from the SOAP API section.
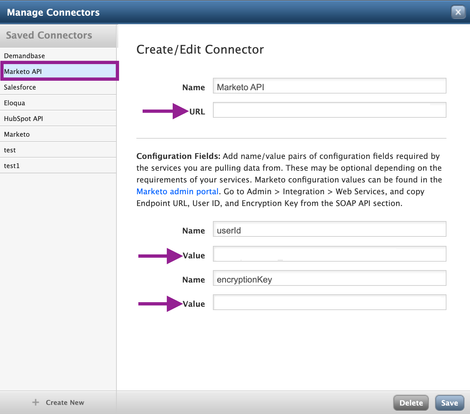
Marketo connector dialog
- Create a connector to send data to your Marketo form by clicking Create New > [Connector Name].
- You will need to create a form in Marketo. Once you have it, enter the endpoint URL, formid, and munchkinId.
Create a form in WCO Wyiswyg
Next, create a form that you can submit to Marketo so that later we can compare the value to target the user.
- From a Wysiwyg that supports WCO create a new snippet > [Enter snippet name] > Save the asset.
- Click "Form" > "New Form" > Build a form > Insert new or existing field. Make sure the field names are same as Marketo form.
Important: create a hidden field with the name "_mkt_trk". We will use this field to track the user later.
- Go to Form Settings > Rules tab > [Select the marketo form connector] > Add Connector > Save and Insert Form. This will insert the form created from WCO into your WYSIWYG. You should see something like below:
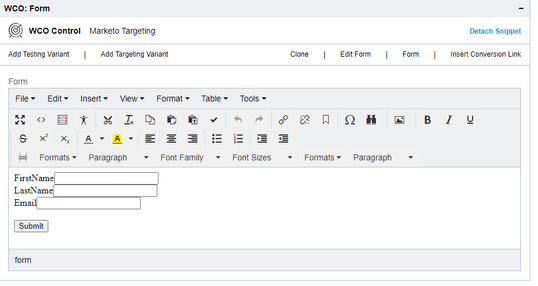
DXM WCO WYSIWYG
- Create a javascript code to copy _mkt_trk cookie generated from Marketo snippet into our WCO hidden field. The idea is to send the tracking cookie to Marketo when the form is submitted.
Below is a sample:
function getCookie(cname) {
var name = cname + "=";
var decodedCookie = decodeURIComponent(document.cookie);
var ca = decodedCookie.split(';');
for(var i = 0; i <ca.length; i++) {
var c = ca[i];
while (c.charAt(0) == ' ') {
c = c.substring(1);
}
if (c.indexOf(name) == 0) {
return c.substring(name.length, c.length);
}
}
return "";
}
function formSubmit(e) {
var $this = $(this);
var marketoCookie = encodeURIComponent(getCookie('_mkto_trk'));
if (marketoCookie != '') {
$this.find('input[name=_mkt_trk]').val(marketoCookie);
}
}
Create targeting from WCO Wysiwyg
- From a WYSIWYG that supports WCO create a new snippet > [Enter snippet name] > Save the asset.
- Create a targeting group by doing "Add Targeting Variant > Create Targeting Group > New Group > Marketo (from New Field) > Edit.
Lead Key Type = Cookie (generated by the Munchkin Javascript)
Lead Key Value = _mkt_trk (this is the field we created while creating the form)
Marketo Field Name = Enter the Marketo field name that you want to compare. You can find a list of all Marketo fields to query in the Marketo admin portal, under Admin > Field Management > Export Field Names. Use the "SOAP API Name" column.
Comparison Value = The return value from Marketo you want to compare.
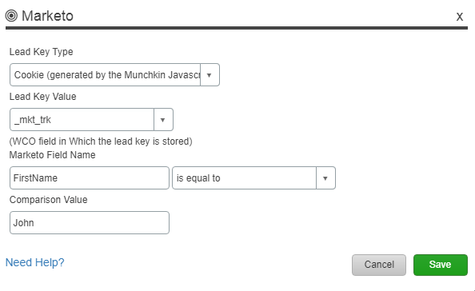
Marketo field information in Salesforce
- Enter a variant name and select the targeting group you just created.
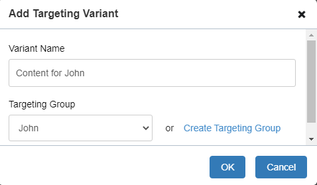
Add Targeting Variant screen in Salesforce
- Enter different content for each variant, then save and publish the page.
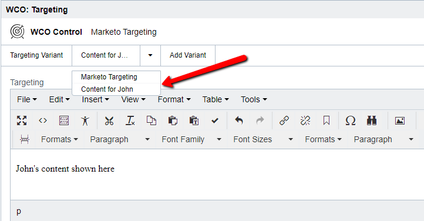
DXM WCO WYSIWYG variant drop-down
Testing
To test, first submit the WCO form then go to the page that has targeting group. The content should change if the information submitted matches the rule created from targeting group.


